


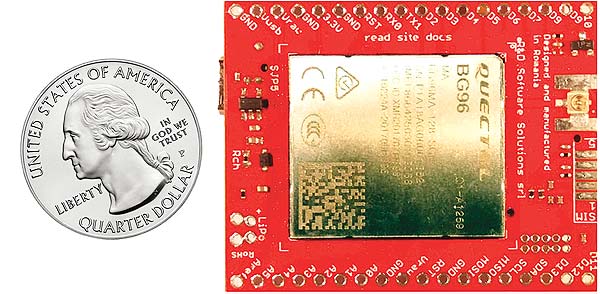
 At April 08th 2018, R&D Software Solutions srl [itbrainpower.net] revealed to the public the announcement of the xyz-mIoT by itbrainpower.net shield – the first, and the most compact, IoT board that combines the versatility of ARM0 micro-controller (Microchip/Atmel ATSAMD21G in Arduino Zero compatible design), the comfortable use of the embedded sensors bundle with connectivity provided by LPWR LTE CAT M1 or NB-IoT long-range & low-power modems or legacy 3G / GSM modems.
Driven by the power and versatility of the embedded ARM0 (ATSAMD21G) core and by interfaces [I2C, SPI, UART, 13 digital I/O – 1WIRE and PWM capable, 5 analog inputs and more], “xyz-mIoT by itbrainpower.net” provides multiple interfacing with devices, sensors and actuators and enables.
The xyz-mIoT shield may have up to 5 integrated sensors, as: THS (temperature and humidity sensors) – HDC2010, tVOC & eCO2 (air quality sensor – CO2 total volatile organic compounds- CO2 equivalent) – CCS811, HALL (magnetic sensor) – DRV5032 sau or IR (infrared sensor) KP-2012P3C , secondary IR (infrared sensor) –KP-2012P3C, TILT (movement vibration sensor) or REED (magnetic sensor) – SW200D.
The embedded sensors that populates the xyz-mIoT shield are dependent on PN ordered.
In order to highlight the advantages given by advanced design and sensors integration, take a look at brief comparative chart with other LTE CATM1/LTE NB-IoT: https://www.linkedin.com/pulse/nb-iot-cat-m1-lte-boards-comparison-dragos-iosub/
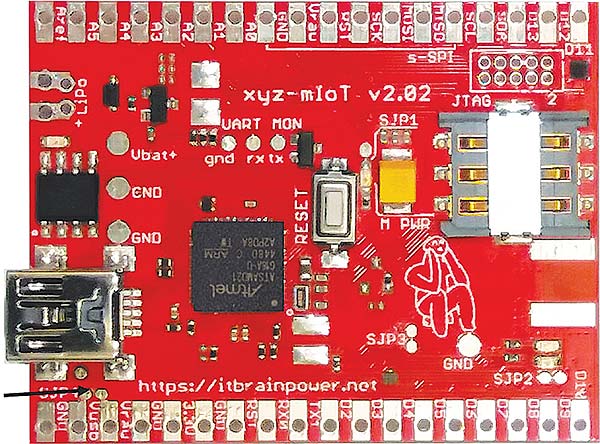
IOT for everybody 10-15 minutes temperature and humidity how to, step 1 — Solder over the two pads of SJP6 (connect USB 5V with Vraw)
xyz-mIoT by itbrainpower.net design was driven by two strategic directives:
• IOT for everybody – one IoT platform that may be used in natural manner but having the power and versatility in order to be used by both professionals and hobby and do it yourself enthusiasts. Obvious Arduino programing was the best choice available; in addition, the professionals will be more than satisfied regarding about multiple hardware and software setup capabilities.
• IOT democracy (Democrația IOT) – anyone to be able to set (in around 15 minutes*) his own IOT sensor with CLOUD data logging.
Bellow, I will show to you how can be done temperature and humidity CLOUD data logging using the xyz-mIoT shield (xyz-mIoT board used must have HDC2010 embedded, select PN as: XYZMIOT209#BG96-UFL-1100000, or GSM only variant XYZMIOT209#M95FA-UFL-1100000), Arduino board programming support and Robofun CLOUD.
* The implementation time may vary depending on previous user experience. Arduino environment installing and manual Arduino class installing are not covered by this how to; try google it. Support libraries and the source code used in this how to are available for download, for registered users. https://itbrainpower.net/downloads.php#xyzmIOT
 Step 1 ▶ connect Vusb with Vraw, solder over SJP6
Enable 5V from USB to be as primary power supply for the board as described up here. Alternative: solder both connectors rows, place the board into one breadboard and connect between Vusb and Vraw using one male-male breadboard wire
Step 2 ▶ Solder the LiPo connector. Insert the micro-SIM in his slot [the SIM must have the PIN check procedure removed]. Connect the antenna, then connect the USB cable to xyz-mIoT USB poert and to your computer. Connect the LiPo battery.
Hardware steps – done!
 Step 3 ▶ Download and install “xyz-mIoT shields Arduino class”, then download the last version of classes: “xyz-mIOT shield IoT Rest support” and “xyz-mIOT shield sensors support class” from here: https://itbrainpower.net/downloads.php#xyzmIOT
Download the demo code “xyz_mIoT_cloud_demo.ino” from here:
https://itbrainpower.net/downloads.php#xyz-mIoT
Make some settings in some files contained inside “xyz-mIOT shield IoT Rest support” class”:
– in “itbpGPRSIPdefinition.h” line 2 set the APN value, using the
APN value of your GSM provider (Eg: NET for RO Orange)
– in “itbpGPRSIPdefinition.h” line 9 set the SERVER_ADDRESS
address for CLOUD Robofun
#define SERVER_ADDRESS “iot.robofun.ro”
#define SERVER_PORT “80”
– in “itbpGSMdefinition.h” comment default option for
“__itbpModem__” and chose (delete comment sign) option
“#define __itbpModem__ xyzmIoT” (line 71)
– in “itbpGSMdefinition.h” chose the right modem for your
xyz-mIoT flavour: for M95FA chose
“#define xyzmIoTmodem TWOG” (line 73)
or for BG96 chose
“#define xyzmIoTmodem CATM1” (line 75)
 Step 4 ▶ Let make a new account on Robofun CLOUD (available at: https://iot.robofun.ro). Add two new sensors (xyzmIOT_temperature and xyzmIOT_humidity). For each sensor, retain the “Tocken” id value (scroll-down in sensor page to find it).
Those values will be used, next, to set sensors id[token id] in Arduino code. In the same page, a little bit above, you will find the public Internet address where you will find the sensor data (observe marked in above picture).
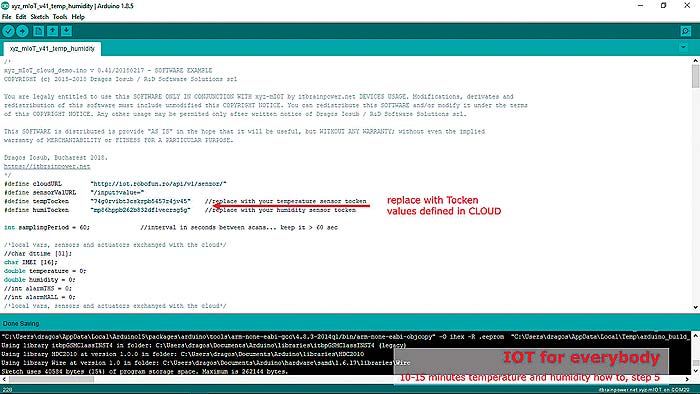
 Step 5 ▶ Open in Arduino (arduino.cc v >= 1.8.5) the xyz_mIoT_v41_temp_humidity.ino project.
Set tempTocken and humiTocken values with the one retained in previous step [created in the CLOUD].
If you use xyz-mIoT shield equipped with BG96 module you can select network registration mode as “GSM mode” or as “LTE CATM1 mode” (mobile network used and SIM card must support LTE CATM1*) by calling client.setNetworkMode(GSMONLY), respectively client.setNetworkMode(CATM1ONLY) function, right after client.begin() in function setup().
* we use for tests Orange Romania LTE CATM1 enabled SIM.
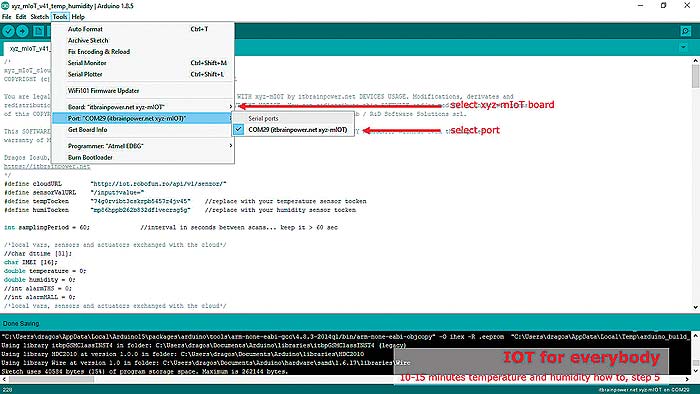
Select “itbrainpower.net xyz-mIoT” board in Arduino menu.
Press twice (fast) the xyz-mIoT shield RESET button [the board will switch into programming mode]. Select “itbrainpower.net xyz-mIoT” programming port in Arduino menu.
Compile and upload the code. The xyz-mIoT shield will start to sample the temperature and humidity data (at 1min. rate) and to upload sampled values to the CLOUD.
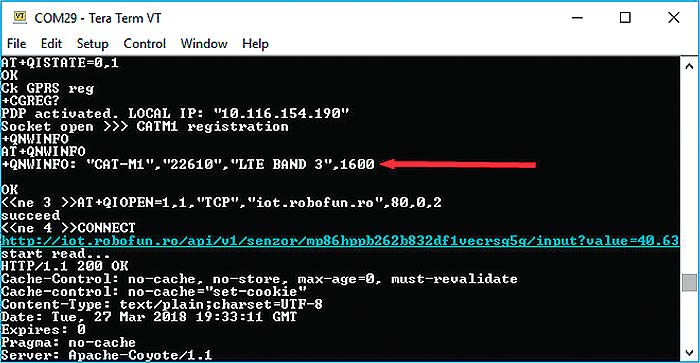 In order to visualize the debug output use the Arduino Serial Monitor or other terminal by selecting the debug port with following settings: 115200bps, 8N, 1.
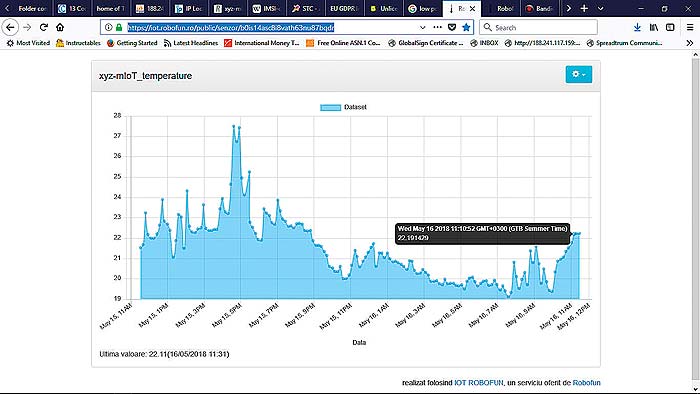
The temperature logged data can be visualized in Robofun cloud sensor page or, in public (shared) page as we specified in Step4.
 xyz-mIoT v2.09 IoT sensor platform – PN coding
Module based PN schema, UFL connector
(choose your modem option):
− xyz-mIoT v2.09, equipped with BG96 [CAT M1 + NB IoT + GSM + GPS] –
PN: XYZMIOT209#BG96-UFL-xxxxxxx
− xyz-mIoT v2.09, equipped with BC95G [NB IoT only] –
PN: XYZMIOT209#BC95G-UFL-xxxxxxx
− xyz-mIoT v2.09, equipped with M95FA [GSM only] –
PN: XYZMIOT209#M95FA-UFL-xxxxxxx
− xyz-mIoT v2.09, equipped with UG95E [3G + GSM] –
PN: XYZMIOT209#UG95E-UFL-xxxxxxx
− xyz-mIoT v2.09, no modem – PN: XYZMIOT209#NOMODEM-000-xxxxxxx
In the previous PN, replace “xxxxxxx” suffix with sensor code (chose the board sensors flavor):
− HDC2010 + DRV5032 – xxxxxxx: 1100000
− HDC2010 + DRV5032 + SW200D – xxxxxxx: 1110000
− HDC2010 + DRV5032 + SW200D + CCS811 – xxxxxxx: 1110100
− no sensor – xxxxxxx: 0000000
For SMA version, replace the “UFL” particle with “SMA”.
 Orders can be done via our web page https://itbrainpower.net or contact us via email: dragos@rdss.ro
Limited number of xyz-mIoT shields having 20% discount are still available for ordering. Do not miss the opportunity!
Author: Dragoș Iosub, R&D Software Solutions
https://itbrainpower.net
dragos@rdss.ro
+40 (0) 745 611611
All Quectel modules are available in Romania with fast delivery from stock through Comet Electronics.
Also, Comet Electronics’s engineers and Quectel technical support engineers can provide you with the support needed to develop any type of applications.
For more information, please contact:

Eng. Ciprian Varga, Technical Director
![]() Comet Electronics | www.comet.srl.ro | office@comet.srl.ro
Comet Electronics | www.comet.srl.ro | office@comet.srl.ro
Str. Sfânta Treime Nr. 47, Bucureşti, Sector 2
Tel.: 021 243 2090 | Fax: 021 243 4090