


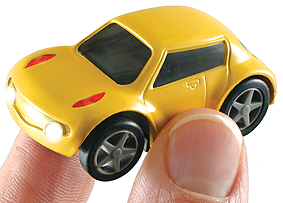
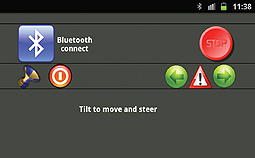
At the very beginning of the last summer I had the opportunity to “play” with a tiny, pretty car, called ZenWheels Micro Car. The car looks rather like a little boy’s toy. One can purchase it in many different colors and control it with a free Android or iOS app directly from phone or tablet. Somewhat playing, somewhat doing “my job” (meaning fulfilling the the task I have been assigned at the summer school I have attended) I have written my very own application for my mobile phone, so that I could feel … better when playing with the gadget.
Author: Georgiana Diana Ciocîrdel – georgiana_diana.ciocirdel@cti.pub.ro
The ZenWheels car has no more than a 2-inch length and almost 1-inch height. I am attaching this article a picture that shows the inner “organs” of the car. We use a LiPo battery to power the car and thus, for a 30 minutes charging, via a micro USB cable, we can play intensively with the car for approximately another 30 minutes. Oh, and what a play! Besides the regular straight front- and backwards driving, left-right steering, and endless attempts of back side parking (not that I can do it better in real life, I have to admit that), the car is also equipped with headlights (both high and low beam), siren with three different tunes, blinking lights on each side and … oh yeah, it horns ! I know this article may sound like a commercial (purely off topic, the car only costs 89.99$, such a bargain, huh?), I should also add some technical details, shouldn’t I?
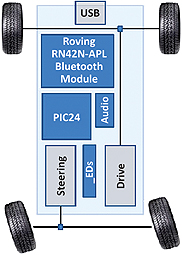
One can control the car using Bluetooth commands. As you can see in the “X-ray” above, the Bluetooth module is RN42N-APL and it is provided by Microchip. You can easily use any device to communicate with the car, on condition that is also features a Bluetooth module. The communication is serial. Each action performed by the car can be translated into a 4-byte code, transmitted and received with the help of the Bluetooth modules. The codes are further interpreted by the PIC24H micro-controller also provided by Microchip.
My Android application is written in Java. As a model I have used an example provided in the Android Development Kit (Bluetooth Chat). The minimum API level of the Android device required to use the application is 8.
The application work flow:
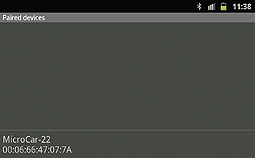
0) In order to transfer any data from the device to the car, the phone/tablet must be Bluetooth paired with the car.
1) On startup, the application identifies the default Bluetooth module of the current device. The Java code actually instantiates a Bluetooth Adapter object, which will be further used in the program. Should the Bluetooth module of the device be switched off, the code fixes the problem, i.e. it asks for the user’s permission to turn it on.
2) The next step to establish the communication between the devices is to open a Bluetooth socket between the two, your phone/tablet and the car, by using the latter’s UUID. UUID means Universally Unique Identifier and it is a 128-bit identifier with high chances of being unique in the Bluetooth transmission area. This guarantees that the 4-byte message that we send to the car will be received and interpreted only by our car. For data exchange we use the RFCOMM protocol, which is a protocol that provides serial data transfer.
3) Once we managed to open the socket, everything should be perfect. We can now start to actually transmit data.
It’s time I gave some details about these codes I have previously mentioned.
The car can basically do a lot of cool stuff – steer, horn, accelerate and decelerate, and so on, depending on what I tell “her” to do through the socket. Say I wanted to go forth. The car provides 64 different speeds, with hexadecimal codes between 0x8200 and 0x823F. By sending one of these codes through the socket, the car will move forward with that certain speed. Moving backwards means using another 64 codes, the horn has its unique code and so on.
There are quite some differences between my application and the original one from Plantraco: I am using the “tilting method” in order to determine the movement of the car. I have used the TYPE_ACCELEROMETER sensors of the device (provided it has some). Depending on how I choose to hold the device, I can use it’s accelerometer to obtain the three Cartesian components (gx, gy, gz) that correspond to the gravitational acceleration (g). After a few
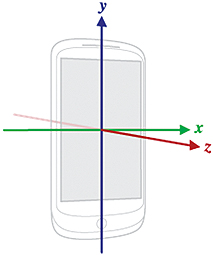
tests, I have decided to assign the values obtained on the Ox axis to the 128 possible velocities the car can have (I have decided to consider both the 64 forward velocities and the 64 backwards velocities as a single array of values) and those obtained on the Oy axis for steering (just like the speed, the steering also uses 128 possible values). While playing, the phone should be kept in a horizontal (landscape) position (I thought this would be the normal position for games like these).
They say some code lines are worth a thousand words, so I will show you some code snippets I have used to move the care back and front:
if(- INIT_Y + yValue > 0) {
steer = (int) Math.min((- INIT_Y + yValue) *
12.4, codes.STEER_RIGHT.length – 1);
byte[] send = ByteBuffer.allocate(4).putInt (codes.STEER_RIGHT[steer]).array();
mBtSS.write(send);
}
else {
steer = (int) Math.min(Math.abs(- INIT_Y + yValue) * 12.4, codes.STEER_LEFT.length – 1);
byte[] send = ByteBuffer.allocate(4).putInt (codes.STEER_LEFT[steer]).array();
mBtSS.write(send);
}
In the same manner as stated above, you can transmit other codes and make the car horn, turn on the headlights or use the warning lights. I should tell you, though, that if you want to “signal your intention to steer” or use them warning lights, it is imperative that you create a new Thread in your application, so as not to interfere with the user interface and the main Activity. In the Runnable assigned to this new Thread you can, for example, send the codes that turn on/off the front
LEDs of the car at every 0.4 seconds. Not that hard, don’t you think?
What I find quite “marveilleux”, so to say, is the fact that the car can actually be controlled with any kind of device that features a Bluetooth module and applications such as mine or the original can be written in any language that implements a Bluetooth stack. For example, I have also experimented a little bit with Python and Qt framework for the GUI directly on my laptop and it all went “formidable”. The steps I followed for building the app were identical: the car’s and laptop’s Bluetooth module must be paired, then a RFCOMM socket must be opened, the hexadecimal messages are transmitted to the car, and a new Thread is always created when executing something in the background (like signaling). The horn is the most amusing, however.
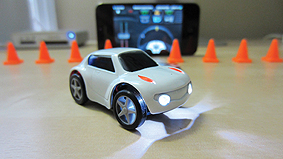
If you want to write this on Android, or further improve the existing applications or simply make your very own app, I recommend you yet again the BluetoothChat example from the Android SDK. However, should you find this whole building-an-application thing rather boring, you could merely use the car for playing? The car comes with 10 cones and a magnetic chip that makes it horn happily each time it crosses over.
Bibliography:
http://zenwheels.com/zenwheels-micro-car-22/zenwheels-micro-car-green.html
http://www.microchip.com/stellent/idcplg?IdcService=SS_GET_PAGE&nodeId=1406&dDocName=en560432
http://www.rcgroups.com/forums/showthread.php?t=1781802
Google Images