
Home automation, home control, smart or digital home are just different names for comfort, convenience, security and power saving. Power saving systems are of increasing importance nowadays. Even though such systems are very expensive, rest assured that they can also be very cheap if you make them yourself. There are many ways to control a smart home system. One of them is over Ethernet.
By Srdjan Tomic, MikroElektronika – Software Department
All you need is a PIC18F4520 microcontroller and an ENC28J60 serial Ethernet chip. This chip is a great solution for other microcontroller families as well such as AVR, dsPIC etc. The CviLux CJCBA8HF1Y0 RJ-45 connector is used for connection to the Ethernet network. An LED connected to the microcontroller PORTB.
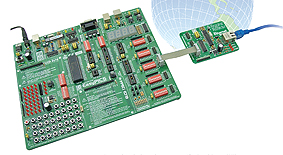
pin0 simulates a home appliance we want to control.
The mikroC for PIC compiler contains the SPI_Ethernet library that will considerably simplify the process of writing a program for the microcontroller. By using a few routines from this library, it is possible to create the program that will enable electrical appliances in your home to be controlled via a web browser.
It is necessary to perform the following operations within the program:
Step 1. Create an html page to run the microcontroller through. Import it in the code as a string.
Step 2. Set IP, DNS, Gateway addresses and Subnet mask obtained from your internet provider.
For example, our local network parameters are as follows:
IP : 192.168.20.60 (Control System address)
DNS : 192.168.20.1 (Domain Name System address)
GATEWAY : 192.168.20.6 (Gateway address)
SUBNET : 255.255.255.0 (Subnet mask)
Step 3. Disable PORTB analogue inputs. The microcontroller pin should be cleared and confi gured as an output.
Step 4. Initialize the SPI module of the PIC18F4520 microcontroller.
Step 5. Initialize the Serial Ethernet module chip ENC28J60.
Step 6. Write the code within the Spi_Ethernet_userTCP function that will, after receiving com mand via web browser, turn on/off the LED connected to the PORTB.pin0.
Step 7. Read received data in an endless loop.
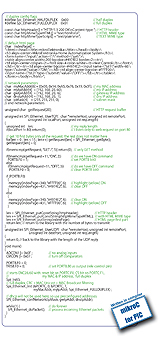
The most important part of the program is the Spi_Ethernet_userTCP function, processing all received commands.
After the web browser “GET” request is received, sent from your computer to the control system IP address, the microcontroller will respond with a web page stored in its memory. This page will then be automatically displayed on the computer screen by the browser.
When the ON command is received, the LED connected to the PORTB.pin0 will be turned on.
Likewise, when the OFF command is received the LED will be turned off . If you have a relay instead of LED, it is possible to control any appliance such as lighting, security system, heating system etc.
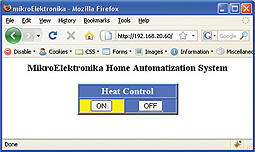
The control of any home appliance consists of entering control system IP address in the web browser and specifying the desired commands.
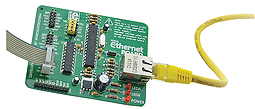
Figure 1. MikroElektronika’s Serial Ethernet module with ENC28J60 chip
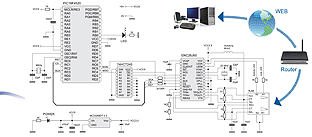
Schematic 1. Connecting the Serial Ethernet module to a PIC18F4520
Of course, it is possible to control more than one microcontroller pin, which enables you to govern a large number of appliances or complete home automation system as well.
The screendump illustrates the web page displayed by the web browser after entering the control system IP address. In our example, ON and OFF button clicks cause the LED to be turned on and off, thus simulating the heating control system.
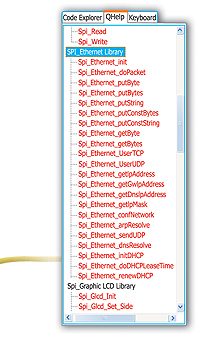
Below is a list of ready to use functions contained in the SPI Ethernet Library.This library is integrated in mikroC for PIC compiler.
Spi_Ethernet_Init()* Init ENC28J60 controller
Spi_Ethernet_Enable() Enable network traffi c
Spi_Ethernet_Disable() Disable network traffi c
Spi_Ethernet_doPacket()* Process received packet
Spi_Ethernet_putByte() Store a byte
Spi_Ethernet_putBytes() Store bytes
Spi_Ethernet_putConstBytes() Store const bytes
Spi_Ethernet_putString()* Store string
Spi_Ethernet_putConstString()* Store const string
Spi_Ethernet_getByte()* Fetch a byte
Spi_Ethernet_getBytes() Fetch bytes
Spi_Ethernet_UserTCP()* TCP handling code
Spi_Ethernet_UserUDP() UDP handling code
Spi_Ethernet_getIpAddress() Get IP address
Spi_Ethernet_getGwIpAddress() Get Gateway address
Spi_Ethernet_getDnsIpAddress() Get DNS address
Spi_Ethernet_getIpMask() Get IP mask
Spi_Ethernet_confNetwork()* Set network parameters
Spi_Ethernet_arpResolve() Send an ARP request
Spi_Ethernet_sendUDP() Send an UDP packet
Spi_Ethernet_dnsResolve() Send an DNS request
Spi_Ethernet_initDHCP() Send an DHCP request
Spi_Ethernet_doDHCPLeaseTime() Process lease time
Spi_Ethernet_renewDHCP() DHCP renewal request
Spi_Init() Initialize microcontroller SPI module
memcpy() Copy microcontroller RAM memory locations
memcmp() Compare microcontroller RAM memory locations
Other mikroC for PIC functions used in program:
Spi_Init() Initialize microcontroller SPI module
memcpy() Copy microcontroller RAM memory locations
memcmp() Compare microcontroller RAM memory locations
Note:
Code for this example written for PIC® microcontrollers in C, Basic and Pascal as well as the programs written for dsPIC® and AVR® microcontrollers can be found on our web site: www.mikroe.com/en/article/
Example 1: Program to demonstrate control over Ethernet